loss
F.cross_entropy()自带 softmax+cross_entropy
import torch.nn.functional as F
input=torch.tensor([[0.0590, 0.6170, 0.3240],[0.0590, 0.6170, 0.3240]])
target=torch.tensor([1,2])
F.cross_entropy(input,target,reduction="none") # tensor([0.8409, 1.1339])
F.cross_entropy(input,target) # tensor(0.9874) average of the two
假如有 weight,传进去weight并不会 scale to 1。
weight 的 mean 应该为 1, 那么weight 的sum 应该是 len(num_class)。每个 weight 和对应的 loss 相乘
这里举个scale为1的例子,但应该乘以 3
weight=torch.tensor([0.1,0.2,0.7]) # weight是tensor
F.cross_entropy(input,target,reduction='none',weight=weight)
# tensor([0.1682, 0.7937])
# 0.1682=0.8409*0.2(cls1)
F.cross_entropy(input,target,reduction='none',weight=weight*3) # tensor([0.5045, 2.3811])
# 0.5045=3*0.1682
类型提升(type promotion)
当不同 dtype 运算时,PyTorch 会提升到更高精度类型
import torch

a = torch.tensor([1, 2, 3])        # int64
b = torch.tensor([0.5, 0.5, 0.5])  # float32

c = a * b
print(c.dtype)
float 默认 dtype 是 32
torch.tensor([1.2, 3.4]).dtype # torch.float32
对比numpy的默认是float64
register_buffer
在class里,格式是self.register_buffer(name, tensor, ); persistent=True是default.
不会让tensor require gradients,不trainable,但可以让module看到这个tensor,并把它移入到cuda里。
class MyModule(nn.Module):
    def __init__(self):
        super().__init__()
        self.register_buffer("my_const", torch.tensor([1.0]))  # non-trainable
        self.my_param = nn.Parameter(torch.tensor([2.0]))      # trainable
persistent=False意味着在save model的时候不会存到state_dict里面。
可以通过model.name查看
model = MyModule()

print(model.my_const.requires_grad)   # False
print(model.my_param.requires_grad)   # True
print(model.state_dict().keys())  # 显示my_const和my_param
model.to('cuda')  # all buffers and parameters move together
install
查看cuda version
nvcc --version
安装
pip install --force-reinstall torch torchvision torchaudio --index-url https://download.pytorch.org/whl/cu121
之后可能需要downgrade numpy 从2.X 到1.X 因为sklearn 用的都是1.X
pip install "numpy<2.0" --force-reinstall
或者由于121只能在torch 2.6以内,无法用torch.load, 可以用cu128 (和cu121兼容)
pip3 install torch torchvision torchaudio --index-url https://download.pytorch.org/whl/cu128 --force-reinstall
然后再downgrade Numpy
用 uv 安装可以自动detect cuda version
uv pip install torch
如果需要强制重新安装
uv pip install --force-reinstall torch
torchrun
添加图片注释,不超过 140 字(可选)
code example
torchrun \
    --nproc_per_node $NPROC \
    --nnodes=$WORKER_NUM \
    --master_addr $WORKER_0_HOST \
    --master_port $WORKER_0_PORT \
    --node_rank=$ID \
    runner/inference.py \
    --seeds ${seed} \
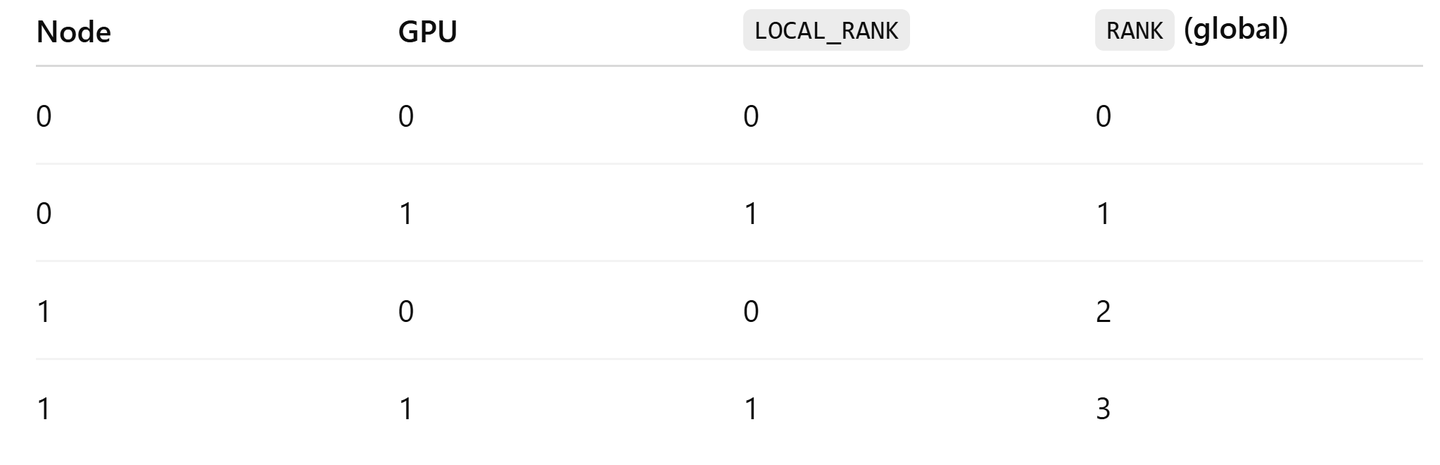
运行之后
os.environ['RANK'] 可以得到在所有机器所有进程中当前GPU的排序
os.environ['LOCAL_RANK'] 可以得到在当前node中当前GPU的排序
os.environ['WORLD_SIZE'] 可以得到GPU的数量
在slurm里,可以自动detect到nproc_per_node, nnodes,可以直接:
srun torchrun runner/inference.py
在standlone模式(手动,非hpc)里,需要明确设置下面这些
    --nproc_per_node $NPROC \
    --nnodes=$WORKER_NUM \
    --master_addr $WORKER_0_HOST \
    --master_port $WORKER_0_PORT \
    --node_rank=$ID \
这是一个例子,加入有一个node,有四个gpu
torchrun \
  --nproc_per_node=4 \
  --nnodes=1 \
  --node_rank=0 \
  --master_addr=localhost \
  --master_port=29500 \
  script.py \
  --args value
broadcast
从最后一个dim开始。
比如The first tensor has shape [128, 1],The second tensor has shape [25]
第一个tensor会从1-->25,第二个tensor会在前面加(1,25)然后从1-->128,最后的shape是128,25
如果一个是一个数 0.99,另一个是一组数[10,1,2], 那么 0.99**[10,1,2] 会自动 broadcast 成
torch.empty vs. torch.Tensor
两者都可以create tensor, 比如创建一个shape 为2,3的tensor,既可以是empty(2,3)也可以是Tensor(2,3)
区别是,Tensor只可以是float tensor, 而emtpy则可以是任意data type,default是float tensor